A Famous Ocean Floor Map

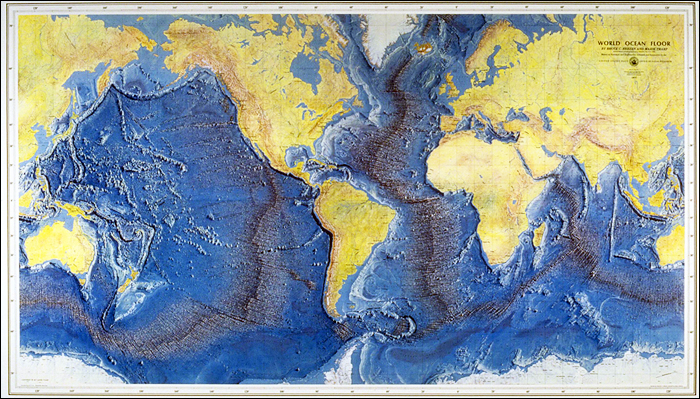
The 1977 World Ocean Floor Map created by Bruce Heezen and Marie Tharp. Image taken from here.

One of the most famous world maps is the 1977 World Ocean Floor Map (see above) created by Bruce Heezen and Marie Tharp, a pioneering female oceanographer and kick-ass female scientist. Prior to the publication of this map, scientists had very little idea of what the seafloor looked like on a global scale.

Although the concepts of mid-ocean ridges and plate tectonics seem innate to the work of oceanographers and geochemists today, these concepts are remarkably recent in their development. Plate tectonics was not fully accepted by the scientific community until the late 1960s and early 1970s, and this first great seafloor map was not published until the late 1970s. Mid-ocean ridges were not discovered until the work of Heezen and Tharp in the 1950s and 1960s.

To this day, scientists still know relatively little about the seafloor. Modern technology is making mapping the seafloor easier, but to obtain detailed information one really must go out in a boat and take many days to carefully study a section of seafloor. Research cruises to map the seafloor are expensive and not always practical. Remote sections of the ocean or places where there is bad weather are difficult to impossible to map. Geologists actually know more about the topography of the moon and other terrestrial planets, such as Mars, than they know about the topography of Earth’s own ocean floor.

Prior to the pioneering work of Heezen and Tharp, almost nothing was known about the topography of the seafloor. The advent of new technologies to study bathymetry and the dedicated work of Heezen, Tharp, and other oceanographers shed some light on the dark, unknown ocean floor. Tharp carefully mapped the Atlantic ocean and discovered the Mid-Atlantic Ridge, a giant chain of mountains running along the middle of the ocean. At first, no one believed Tharp’s discovery of mid-ocean ridges. In the days before plate tectonic theories had been worked out and generally accepted, having a giant mountain chain in the middle of an ocean didn’t make much sense. There was no obvious reason why such a mountain chain should occur in the middle of an ocean.

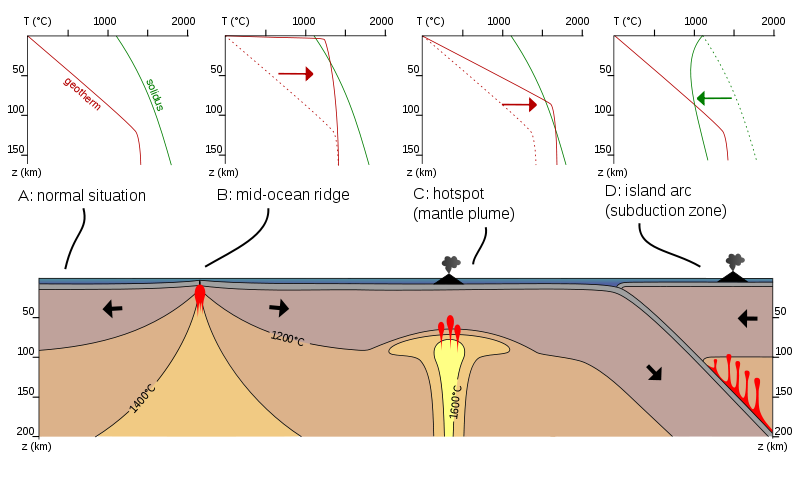
Later, scientists realized that such ridges made perfect sense: mid-ocean ridges represent places where two oceanic plates are moving apart and new oceanic crust is forming from volcanic eruptions. At a mid-ocean ridge, the young, hot lava is bouyant and creates a topographic high. As the oceanic crust moves away from the ridge and ages, it cools and becomes more dense. The crust contracts and also sinks lower into the mantle, creating a topographic low. Thus, the ocean is shallower at mid-ocean ridges and deeper in the middle of oceans and also at subduction zones, places where the oldest, densest oceanic crusts subducts underneath lighter continental crust.

The famous 1977 seafloor map of Heezen and Tharp was a revolutionary map for the worldview of oceanographers. All of a sudden, oceanographers had an elegant, dramatic picture of the mid-ocean ridges running through the world’s oceans like seams on a baseball. The map made sense in the framework of the young science of plate tectonics.

Although new data on the seafloor has been collected using modern techniques such as multibeam bathymetry (bouncing waves off the bottom of the ocean to calculate topography) and satellite altimetry (using the height of ocean waves to look for gravity anomalies and infer the topography below), the 1977 Heezen and Tharp map is still remarkably accurate, especially considering they made up (honestly– they didn’t deceive anyone) parts of the map where they had no data.

Heezen and Tharp’s 1977 seafloor map is also remarkable for its aesthetic beauty. The map was actually painted by a famous landscape and panorama artist named Heinrich Berann, a very talented Austrian painter. Berann masterfully captured the dramatic mountain ranges of the mid-ocean ridges in his painting.

Bruce Heezen died many years ago, and Heinrich Berann died a few years back. Marie Tharp just died in 2006 at the age of eighty-six. Here’s to a great female oceanographer and scientist. I hope that my career in oceanography has a tenth of the influence Marie’s career did.

Bruce Heezen and Marie Tharp. Image from Wikipedia Commons.
Marie Tharp in 2001. From Columbia University Website here.

Geology Word of the Week: H is for Hotspot

Travertine forming at a hotspring, Yellowstone hotspot, Fall 2005.

 def. Hotspot:
1. A place where you can obtain internet in order to write your geology blog.
2. A thermal anomaly within Earth’s mantle, generally consisting of a hot, rising plume of mantle material that generates volcanism- or increased volcanism- on Earth’s surface.

Hotspots are aptly named- they are spots of the Earth that are hot. They are spots because they are limited in area- no more than a few hundred kilometers in diameter at the largest. They are hot because their temperature is hotter (generally by 100-200 degrees C) than the ambient, surrounding mantle.

Although they produce volcanism in Earth’s crust, hotspots are really features of Earth’s mantle. Hotspots are likely- at least in the case of the largest ones such as Hawaii and Iceland- plumes of hot, rising material that originate in the lower mantle, perhaps even as deep as the core-mantle boundary. Hotspots are almost stationary features in the mantle. There is evidence that hotspots can drift extremely slowly in the mantle, but hotspots are essentially stationary relative to the faster-moving tectonic plates.

As a tectonic plate moves over a mantle hotspot, a chain of volcanoes is produced. The most famous of these chains is the Hawaiian Islands & Emperor Seamounts in the Pacific Ocean. These islands and seamounts are age progressive. The youngest island, Hawaii, is volcanically active and is where the crust is currently located over the hotspot. As the crust moves, another island will eventually form- in fact, one is forming underwater now, and it is named Loihi! Behind the main island of Hawaii, there are other, older islands that are not currently volcanically active. Beyond the islands, there is a long chain of underwater seamounts- these seamounts used to be subaerial islands but because of subsidence and erosion they are now underwater hotspot remnants.

The Hawaiian-Emperor hotspot trail. Image from Wikipedia Commons.
The Hawaiian Hotspot. Image from Tasa Graphics.

Hotspots occur all over the Earth- they can produce volcanism both on oceanic crust and on continental crust. Famous hotspots include Hawaii, Iceland, Yellowstone, Afar, Reunion, Ninetyeast Ridge-Kerguelen, Galapagos, and the Azores. One interesting aspect of many hotspots is that they produce volcanism in the middle of tectonic plates. Volcanism generally occurs at plate boundaries, not in the middle of plates such as in the case of Hawaii. A quick look at the location of tectonic plates and the location of worldwide volcanism (see maps below) shows that this is true- hotspots are, indeed, places of anomalous volcanism.

Some hotspots do occur at plate boundaries. Iceland is the most well-known example of this and is located along the divergent plate boundary of the Mid-Atlantic Ridge. Plate boundaries (at least divergent and convergent/subducting ones) generally produce volcanism. When a hotspot is located along a plate boundary, more volcanism is produced. In the case of Iceland, so much volcanism is produced that the mid-ocean ridge is actually exposed subaerially. Iceland is the only place in the world where you can go and walk along an active mid-ocean ridge. You can actually walk the ocean floor (well, sort of… technically it is a subaerial island) in Iceland!

Tectonic Plates. Image from USGS, taken from Wikipedia Commons.
Global Map of Volcanoes. From the Global Volcanism Program website.

You can explore locations of volcanoes on the Global Volcanism Program website here

Hotspots are capable of generating enormous amounts of lava and volcanism. When hotspot plumes first form, they are thought to produce large flood basalts. For instance, the Deccan Flood basalts (associated with the Reunion hotspot), the Kerguelen flood basalts (associated with the Heard Island & Ninetyeast Ridge hotspot), and the Columbia River flood basalts (associated with the current Yellowstone hotspot) are all gigantic volumes of basaltic lava that is thought to have been produced when a hotspot plume “head” first reached the Earth’s surface. After this initial outpouring of basalt, the hotspot plume “tail” is thought to then produce a more steady, smaller amount of lava that creates a chain of volcanoes.

Plume head and tail. Image from Tasa Graphics.

Even plume “tails” can generate enormous amounts of volcanism. For instance, Mauna Kea on the island of Hawaii is only about 1 million years old but is actually (measured from the seafloor) the tallest mountain on Earth.

So, we’ve established that hotspots are spots of hot that produce volcanism. But why does being hot produce volcanism? This may sound like a simple question but, most of the time, lava- or melted rock- is not produced through heating. Think about it- the crust and upper mantle (where melts are produced) is actually colder than the lower Earth. So as mantle material rises, it generally becomes colder- not warmer. The wonderful diagram below (from Wikipedia Commons) explains how melts are produced in the Earth. The geotherm is the rate at which the temperature changes with depth in the Earth. The solidus is the line below which the mantle is solid. Above this line, the mantle starts to melt. When the geotherm crosses the solidus, melts are produced.

In the normal case, the solidus and the geotherm do not cross and no melting (and thus no volcanism) is produced. When plate diverge, mantle material rises and decompresses- the mantle melts because it encounters a lower pressure. When plate converge and subduction occurs, the subducting plate releases volatiles (such as water and carbon dioxide) and these volatiles lower the solidus temperature and the mantle melts. At hotspots, the geotherm is higher (by about 100-200 degrees C) and melting is able to occur.

Excellent diagram showing the three ways that melts are produced on Earth. Click on image for a larger view. From Wikipedia Commons here.

Hotspots were first postulated in 1963 by  J. Tuzo Wilson. Wilson (or J.T. as I like to call him) proposed that chains of volcanic islands could be produced as tectonic plates moved across a deep thermal anomaly within the Earth. Since J.T., hundreds (thousands?) of geologists have studied hotspots and tried to understand them. We have come a long way in understanding hotspots, but there is still debate and still much that is unknown.

One thing we know is that the simple Hawaiian model does not work everywhere. Not all anomalous (i.e. not at a plate boundary) volcanoes are produced because of a thermal anomaly. Some may be produced because of compositional anomalies in the mantle- pieces of mantle that are easier to melt than the “normal” mantle. Even Hawaii is somewhat anomalous- there is no clear flood basalt associated with Hawaii. So, what happened to the plume head? Were flood basalts produced? If so, where did they go?

Clearly, we still have much to learn about our mantle and about the nature of hotspot volcanism. There is even a minority group of scientists who believe that mantle plumes do not exist at all. There is a great website called Do Mantle Plumes Exist? where scientists on both sides of the plume debate engage in conversation. I think that the plume deniers take things a little too far- it’s clear that the well-known hotspots such as Iceland, Hawaii, and Yellowstone are produced by long-lived, deep, mantle plumes. Geophysics has even allowed us to image these amazing plumes. The plume deniers do have some excellent points, however. Not all “hotspot” or “anomalous”  volcanism can be explained by mantle plumes. I think that it is important to listen to these plume deniers and their criticisms. Because good science is about discussion and refinement of ideas based on evidence.

Image of the Iceland plume. Taken from here.

Audio Slideshow on My Thesis Research in Oman

Sitting on some travertine, Samail Ophiolite, Oman, January 2009.

A little over a year ago, Woods Hole Oceanographic Institution’s Oceanus Magazine put together a wonderful audio slideshow on my thesis research in Oman. Since I just presented some of the results of this research at AGU, I thought this would be a good time to post a link to the slideshow. Be sure to check out the other Oceanus audio slideshows here. There is so much great research happening at Woods Hole Oceanographic Institution! These slideshows are designed for a general audience, so I explain my research in fairly simple terms. One of the challenges of recording the audio for this slideshow was avoiding technical language. They made me keep re-recording the audio until I was able to explain my research with as little jargon as possible! Also, I apologize for my overuse of the word “fascinating.” I just find my research so- well- fascinating!

Click on the link below to watch the slideshow:
Oceanus Audio Slideshow

AGU Wrap-Up

San Francisco sunset, December 2010. Picture taken by my friend Kyle.

I am currently in the San Francisco airport waiting to fly back from the American Geophysical Union Fall Meeting to my home base in Woods Hole. My flight back to Boston was supposed to leave an hour or so ago, but the flight has now been delayed by several hours due to “severe weather.” The weather didn’t look so bad when my fiance and I left our hotel this morning, but I guess that there are some bad clouds and high winds up where the airplanes fly. Looking outside the airport window now, the fog is producing pretty much white-out conditions.

Oh, well. Hopefully, we’ll be able to rebook our connection in Salt Lake City and make it to Boston sometime late late late this evening. I have the best fiance ever- he flew in from South Africa (about 30 hours of traveling) on Saturday night and left with me for AGU Monday afternoon (another 13 hours or so of travel). He sat patiently through a full day of AGU on Tuesday and partial AGU days on Wednesday and Thursday. Fortunately, since he’s also a geologist his company paid for him to attend AGU as well, so he was able to go off to some interesting sedimentary talks while I met up with colleagues and attended the CO2 sequestration talks which are related to my research. Now that we’re looking at a very long trip home, my fiance is still being very sweet. He’s been standing in line for about 30 minutes waiting to rebook our flight. I definitely have found myself a keeper.

On Wednesday morning at AGU, I presented a poster about my thesis research on dating carbonate alteration products forming in the mantle (ultramafic) section of the Samail Ophiolite in Oman. Formation of these carbonate alteration products is interesting because they naturally remove CO2 from the atmosphere and store it in solid mineral form. In my thesis, I want to understand how quickly (naturally) these carbonate alteration products form and, after they form, how quickly they erode. My poster session went well, I think. I certainly had plenty of visitors to my poster- I talked for about 3 hours straight before taking a break. I really enjoyed meeting all sorts of scientists interested in my research, including many people who work on carbonate formation in other ultramafic rocks and other environments, such as serpentine mines. 

In addition to attending sessions related to my research, I attended the AGU Sciences Meet Hollywood event, which was FANTASTIC. I’ll probably blog more about this event later, but the speakers were excellent and the room was packed full. Clearly, many scientists are very interested in how science in portrayed on TV and in the movies. Similarly, many Hollywood people are interested in meeting scientists- to “get the science right” as best as possible and also to be inspired by science. As one panelists put it, Hollywood needs some new plot ideas for science fiction movies and what better place to go than real science!  There was much discussion about “story verses science”, reasons to “get the science right” in movies & TV, and  ways for scientists and Hollywood types to interact. I think that everyone really enjoyed this session.

Overall, my first AGU meeting went very well. As I expected, I found the meeting somewhat overwhelming. With about 20,000 scientists and thousands of talks and posters, I was not able to see everything that I wanted to see. I had to choose the most important (relevant to my research) and interesting events, and I had to be okay with not seeing everything that I found interesting. A part of me wishes that I had been able to attend AGU Monday-Friday, but in some ways I’m glad that I only went to AGU for 3 days (really about 2 1/2 days). I was able to pace myself and really focus on the talks and posters that I considered most important. One thing that pleasantly surprised me was how well-organized the AGU meeting was. The meeting worked like a large but well-oiled, well-maintained machine. The conference facilities were very nice, and since many AGU attendees had been to AGU many (often countless) times before, most of the 20,000 attendees knew where they were going and what they were doing and were very helpful with directions.

If I attend AGU for the full week next year, I will be sure to take some time off here and there- I think trying to attend all 5 days of AGU is too much. In addition to talks and posters, there were all kinds of other activities such as lunches, drinks, and dinners with colleagues. I even attended a wedding reception on Thursday evening for two good geologist friends! Even with 20,000 or so attendees, I was surprised at how many people I knew and ran into in the exhibitor hall or on the street or in a poster session. I ran into old friends from undergrad, many friends from grad school, and even some geologists my fiance knew from South Africa! San Francisco, I have to say, is a wonderful city. Despite the risk of earthquakes, I think this is a great place to have an annual conference. I hope to attend many more AGU meetings here. And a geophysicist friend of me explained why AGU is held in earthquake-prone San Francisco every year: the geophysicists are all secretly hoping that there will be a big earthquake so they can run around and observe everything.

Okay, time to see if my fiance has managed to rebook our flights… I hope so!

Update: Looks like we will be spending the night in Salt Lake! Hope that we can find a hotel. I also hope that other AGU-goers have smoother journeys home. Now I guess we can see a little of Salt Lake, which is nice.

Geology Word of the Week: G is for Gondwana

Gondwana reconstruction. Image from Wikipedia Commons.

This week we are at the letter G… I immediately thought of one of my favorite geology words: Gondwana!

def. Gondwana:
Gondwana is an ancient geological supercontinent that was comprised of modern-day Antarctica, South America, Africa, Australia, New Zealand, India, and Arabia. Gondwana first formed ~500 million years ago and later joined with the supercontinent Laurasia, that was comprised of modern-day North America, Europe, and Asia, to form a super-supercontinent named Pangea. Subsequently, Pangea began breaking up ~175 million years ago. The first stage of that separation was rifting of Laurasia from Gondwana. Eventually, all of the modern-day continents formed and gradually moved (over the past ~175 million years) into their present positions.

I love thinking about past supercontinents and super-supercontinents. Think about how different the planet must have looked: one massive continent and one massive ocean only. Imagine trekking across that massive continent or trying to sail across that massive ocean– which was called Panthalassia, by the way. What great names: Pangea and Panthalassia. Imagine how much easier geography class must have been back then (purely hypothetically, that is, since there were no humans). No memorizing the 7 continents and various oceans in primary school. Just one land and one ocean to remember.

Pangea is not the only supercontinent in Earth’s history, just the most recent one. Geologists believe that there have been several cycles of supercontinents forming and breaking up. Of course, the further back one goes in geologic time the sparser the evidence (much is destroyed in cycles of continents forming and breaking up), so much less is known about these earlier supercontinents. However, geologists have given them very cool-sounding names: Pannotia, Rodinia, Columbia, Kenorland, Ur, and Vaalbara.

There are many neat animations on the web showing the formation and break-up of Pangea and other past supercontinents. Here is one animation I like.

A Geology Conference in an Earthquake Zone

Hotel Earthquake Evacuation Guide, San Francisco, December 2010.

After a long day of travel yesterday, I arrived in San Francisco for the annual American Geophysical Union (AGU) Fall Conference. The conference is held here in San Francisco every year. This is my first time at AGU. I’m very excited to be here, if a little overwhelmed by all of the people! I have to wonder a little, though, about the choice of conference venue. San Francisco, as the above “Earthquake Procedures” emergency evacuation guide I found in my hotel room reminds me, is located along the San Andreas fault and is prone to Earthquakes.  Sure, there hasn’t been a major earthquake (as far as I know) during this or previous AGU conferences, but it’s only a matter of time. Hopefully, during this (and subsequent) AGU meetings there won’t be a repeat of the great 1906 San Francisco Earthquake. Perhaps AGU should consider moving their fall conference to a more geologically stable interior region- Kansas, for instance. Though I guess then you’d have to worry about tornadoes. And perhaps it wouldn’t be quite as scenic.

I’ve had a great conference so far- I spent the day meeting with colleagues and attending a session on geological carbon sequestration. I also visited the vendor’s hall and visited the life-size mock-up sphere of the Alvin deep-sea submersible, which was transported by truck from Woods Hole Oceanographic Institution (WHOI), my home base of operations. Be sure to stop by and visit the sphere- you can also enter a raffle to win a real Alvin porthole! WHOI, by the way, is an oceanographic institution located on ephemeral glacial till that will likely be underwater in the near future due to sea level rise…

Me and the Alvin Sphere Mock-Up, San Francisco, December 2010.

Okay, off to explore San Francisco a little! Hope to see some of you tonight at the AGU Movie Event!

What to Buy a Geologist for Christmas- Part II

My What to Buy a Geologist for Christmas post has been attracting some serious (well, for my little blog anyway) traffic over the past few days. Apparently, many people find my blog post by googleing phrases such as “geology christmas gifts,” “geology gifts,” and “what to buy a geologist.” I guess many people are doing their Christmas shopping for their geologist friends and family!

Over the past few days, I’ve thought up another ten items that I think a geologist would like for Christmas. Again, please feel free to post your own suggestions for geological Christmas gifts in the comments!

Gift #1: Trilobite Jewelry from Surlyramics

Image from Surlyramics Etsy shop.

Image from Surlyramics Etsy shop.

Amy Davis Roth is a talented artist. She makes all kinds of pretty ceramic jewelry- art you can wear, as she puts it! I am particularly fond of Amy’s trilobite jewelry. I think I just might have to order some trilobite jewelry for myself for Christmas… or coax  my fiance (who has yet to buy me a gift, as far as I know) into ordering some for me. You can check out Amy’s trilobite– and other jewelry, much of which is skeptical and scientific– on her website, in her Etsy Shop, and in her Artfire Shop.

Best of all, if you use the code “SKEPCHICKMAS” you receive 10% off your purchase… good for the rest of December!

Cost: About $20. Prices vary by item.

Gift #2: Roadside Geology Books

Image from Geology.com store.
The “Roadside Geology” guidebook series is wonderful.These guides give a very accessible overview of the geology of each US state and are great for planning field trips- for geology classes or just for fun- to various geologic features. The books do, indeed, focus on roadside geology. Much geology can be seen at roadcuts, especially in states that have plenty of vegetation and biological thingies covering up the interesting rocks. So, these books tell you where to find the good roadcuts!
But which book to order? Well, you can order the book for the state where your geologist lives. Or you can think of a state they plan to visit and you can order that title.
You can order the Roadside Geology books from Geology.com or from Amazon.com
Cost: About $20 each.

Gift #3: The Age of the Earth

Image from Bookapex.com

This is one of my favorite books. This book explains exactly how we know the age of the Earth, which is about 4.5 billion years old (not 6,000 as the Young Earth Creationists say). I first read this book several years ago when I was curious how we knew the age of the Earth… after all, we don’t have any Earth rocks that are that old. There are a few rocks that are about 4 billion years old, but none that date exactly to the age of the Earth! This book explains how dating of meteorites and the Pb isotope system (in particular) allow geologists to constrain the age of the Earth very well. This book is great read and explains complex isotope dating systems in a straightforward manner. I highly recommend this book for all geologists.

Cost: About $30.

Gift #4: Simon Winchester Books

Image from SimonWinchester.com
Image from SimonWinchester.com.

Simon Winchester is a great geology writer- and a great writer in general. My all-time favorite book of Winchester’s is actually “The Professor and the Madman” about the making of the Oxford English Dictionary. However, that’s not a geology themed book… so for geology Christmas gifts I recommend these three books: “Krakatoa: The Day the World Exploded: August 27th, 1883,”  “The Map that Changed the World: William Smith and the Birth of Modern Geology,” and “A Crack in the Edge of the World: America and the Great California Earthquake of 1906.”

Great books- feel free to buy one or all three!

Cost: About $10 each from Amazon.com

Gift #5: A Giant World Map

Image from Amazon.com.

Geologists love maps. They will cover their walls with maps, if their significant others and housemates let them. What better to give a geologist than a giant world map? I recommend the above map, which can be bought here from Amazon.com.

Cost: $83.90 (on sale!) at Amazon.com. You can also purchase a smaller world map- for about $10-20.

Gift #6: Prints from National Geographic

Volcanic eruption and lightening in the ash plume in Eyjafjallajokull glacier in Iceland. Image and caption from NationalGeographic.com.

There are hundreds of photographs- including many with geological themes- from the National Geographic magazine that you can order as prints here. You can also print your own National Geographic wall art here, which I believe is free! Of course, geologists always take their own pictures in the field- but some of the National Geographic images, such as the one above of the Eyjafjallajokull eruption, are absolutely stunning.

Cost: About $20-$200 (depending on size and framing).

Gift #7: Hand Lens

Image from GeologyOutfitters.com.

Geologists use hand lenses to magnify rock features (mostly minerals) in the field for identification. A good hand lens is a very useful tool for a geologist! You can order high-quality hand lenses here.

Cost: About $30-$40.

Gift #8: A Gift Certificate to an Outdoor Shop

Image from SierraTradingPost.com.

Geologist love buying hiking gear- field shirts, hiking boots, hats, fleeces, and so on. So, a gift certificate to an outdoor shop such as Sierra Trading Post, EMS (Eastern Mountain Sports), The North Face, REI, L.L.Bean, Patagonia, etc. is sure to be a hit. If you don’t like giving gift cards, just order your geologist a field hat or shirt or even some warm wool socks.

Cost: Whatever you want!

Gift #9: More Geology T-Shirts

Sedimentary, My Dear Watson. Image from CafePress.com.
Never volunteer to help a geologist move. Image from CafePress.com.
Geology: rock always wins. Image from CafePress.com.

Geologists don’t really have a dress code… unless that code is breaking any sort of department dress code. Geologists tend to wear fun t-shirts, jeans, and teva sandals to work. CafePress has many great geology t-shirts. Just go to their website and search “geology t-shirt.” Above are few CafePress t-shirts that I like, but there are many others. Go check it out!

Cost: About $20-$30.

Gift #10: Periodic Table of the Elements Shower Curtain

Image from ThinkGeek.com

This gift is ideal for the geochemist! I know that there are sometimes days when I’m thinking about my geochemistry while brushing my teeth or in the shower, and I wish I had a periodic table on hand. The perfect solution is this periodic table shower curtain. If you want something that every geologist (even a geophysicist!) is sure to love, there is also the world map shower curtain (below). You can order the periodic table shower curtain from ThinkGeek.com here and the world map shower curtain from Amazon.com here.

World map shower curtain. Image from Amazon.com.

Cost: About $15-$30.

AGU Movie Event

“The Core” movie poster. Image from wikipedia.com.

 “Deep Impact” movie poster. Image from wikipedia.com.

For those of you who like bad geology movies and who are attending the American Geophysical Union conference next week in San Francisco, I just wanted to advertise that there is an event called AGU Sciences Meet Hollywood.

The director of “The Core” and the screenwriter for “Deep Impact” will be there, among others. Sounds like fun!

This event takes place Tuesday night in Moscone Center South, Room 300. Hope to see some of you there!

Geology Word of the Week: F is for Fabric

Poikilitic texture. Image from About.com (Geology).
def. Fabric:
The arrangement of the elements (minerals, textures, fossils, layers) that make up that rock. The fabric of a rock is basically the pattern of the rock.

In geology, like in many scientific and non-scientific specialties, everyday words often take on new meanings. Everyday words such as fault, joint, layer, reef, slip, mantle, blast, cauldron, dip, strike, exposure, and many others have specific meanings in geology. These meanings are often vaguely related to their more conventional meanings, but not always.

For example, take the word “reef”. This word has two definitions, both of which are geologic in nature. The more conventional definition of reef is a strip of rocks, sand, and/or coral that rises near the surface of water. This is a place you go snorkeling or scuba diving to look at pretty fishes and other biological-thingies (hey, I know rocks, not animals). However, another definition of the word reef in geology is a vein of rock (or ore) that is rich in a particular element or mineral. One of the most common ways to use reef in this context is to refer to the reefs of gold-rich ore located in South Africa.

My geologist fiance (who now works for a South African-based gold company) taught me this second definition of reef several years ago when we first started dating. He thought I was an idiot for not knowing the definition already, but he was too polite to say so at the time. Before I figured out the second definition, we had a very confusing conversation that went something like this:

Future fiance: “So, I think we’re going to visit some reefs for our honours geology field trip.” Note that he’s South African so he always speaks in “ou”s.

Me: “Oh, that’s great- so will you be staying along the coast then?”

Future fiance, sounding slightly befuddled: “What? No- we won’t be along the coast. We’ll be inland, near Joburg.”

Me: “Oh. I see- they’re fossil reefs. I didn’t realize there were fossil reefs inland. How old are they?”

Future fiance, talking slowly as if to a child: “Why, Precambrian of course. Most of the reefs in South Africa are Precambrian.” For the non-geologists, Precambrian is very old- older than 542 million years.

Me: “Wait… Precambrian? How can reefs be preserved that long?”

Future fiance, now clearly thinking me an idiot: “Well, most of the reefs are that old.”

Me: “So, wait, do these reefs record paleo-sealevel? They can’t be Precambrian.”

Future fiance: “Sea level? What? These are gold reefs.”

Me, utterly confused: “Gold reefs?”

You get the idea… shortly after this, I figured out that there is a second definition of the word reef. I should have known this, but then again it is a much more common word to teach in a South African geology class than in an American geology class.

Anyway, this week’s Geology Word of the Week is actually not “reef” (primarily because I’m at the letter F this week) but rather “fabric”. This is a word that has a conventional meaning and a geologic meaning. In geology, fabric refers to the arrangement of the elements (minerals, textures, fossils, layers) that make up that rock. The fabric of a rock is basically the pattern of the rock.

There are hundreds of words describing specific rock fabrics. This is not so different, I suppose, from the dozens (maybe hundreds?) of words used to describe fabrics in a conventional sense. We have words such as plaid, striped, paisley, gingham, and checked to describe conventional fabrics. Geologists have words such as euhedral, perthite, ophitic, holocrystalline, poikilitic, glomeroporphyritic, cross-bedding, lenticular beds, flame structure, foliation, and- a favorite of mine- schistosity to describe rock fabrics. These words are more complex-sounding and esoteric than words such as gingham, but the idea is the same. These geologic words describe rock patterns just as the conventional words describe cloth (or fabric) patterns.

Below are a few more pictures of rock fabric. I won’t explain all of these fabric names in this post, but perhaps some of these fabric words will become future Geology Words of the Week!

Braided stream cross-bedding, South Africa, September 2010.
Cross-bedding in sand dunes, South Africa, December 2009.
Schistosity and porphyritic texture in thin section. Image from wikipedia commons.
Perthite fabric in feldspar. Image from wikipedia commons.
Brightly-colored perthite in feldspar (in thin section, microscope image). Image from wikipedia commons.

How to Wash Dishes

Teflon beakers in Aqua Regia.

Some days, I feel that I do nothing but wash dishes… I wash dishes in lab and then go home and wash more dishes. Below is my guide to washing dishes, both at home and in lab.

Appropriate set-up for washing dishes at home.

How to Wash Dishes at Home (Graduate Student Version):

Definition of  dishes:  An eclectic assortment of plates, bowls, cups, mugs, and utensils gathered from your mom, grandmother, friends who graduated/got married, and discount stores.

Supplies Needed: Divided sink or sink + bucket, dish soap, sponge, steel wool, water, dishrack.

1. Allow dishes to accumulate for 3 to 5 days. If you have a non-graduate student housemates and/or spouse, reduce accumulation time to 1 to 2 days.
2. Give the dishes a thorough rinse under the sink faucet, especially if they’ve been accumulating for 3+ days. Scrape excess food particles/goo into the trash or garbage disposal.
3. Fill the sink with hot, soapy water. Fill the other half of the sink (or a bucket) with hot water.
4. Scrub the dishes with the sponge and steel wool in the soapy water.
5. Rinse the dishes in the hot water.
6. Place on dishrack to dry.
7. Let dishes sit on dishrack until needed for eating food. 

How to Wash Dishes at Home (Graduated Student Version):

Definition of dishes: Beautiful matching sets of plates, bowls, cups, mugs, wine glasses, and utensils that you obtained as wedding gifts and/or bought from a nice store (Pier 1, Ikea, Target- pronounced “Taarjaay” to sound fancier) with your “real job” money.

Supplies Needed: Sink, dishwasher, dish soap.

1. Allow dishes to accumulate for 0-1 day.
2. Give the dishes a quick rinse under the sink faucet.
3. Place dishes in dishwasher.
4. When full, add soap and run dishwasher.
5. Put dishes away shortly after the dishwasher is done running.

Appropriate set-up for washing dishes in lab.

Freshly-washed lab dishes.

How to Wash Dishes in Lab: 
***Disclaimer: Please only follow these directions in a geochemistry lab under proper supervision and with proper safety equipment. This is my dish washing protocol. Note that every geochemistry lab has its own protocol.***

Definition of dishes: Teflon beakers used for geochemistry.

Supplies Needed: Ultrapure (MilliQ) water, pure nitric acid, pure hydrochloric acid, methanol, kimwipes, sink rated for disposal of trace amounts of acid, large glass beakers (2L works well), watch glass lids for glass beakers, teflon tongs, large fume hood, large hotplate, nitrile gloves, chemical-resistant bodysuit, plastic lab clogs, safety glasses, face shield, permanent marker.

1. Allow dirty dishes (from chemistry) to accumulate. There are always dirty dishes, and it takes several days to clean them, so it’s best to move the cleaning along every day.
2. Don appropriate safety gear. For steps 3-4 the clogs, chemical bodysuit, nitrile gloves, and safety glasses are fine. After step 4, add the face shield and a second pair of gloves, preferably gloves that come up to your elbows.  
3. Remove “permanent” marker labels from dirty teflon beakers using kimwipes (laboratory tissue) and methanol. Remove any gritty sample residue from inside of beakers using kimwipes. Then, place the teflon beakers in a 2L glass beaker.
4. Rinse the beakers thoroughly in ultrapure (okay to use less pure) water. Pour this water into the sink.
5. Add 50% hydrochloric acid to the glass beaker. Make this by adding concentrated pure hydrochloric acid to ultrapure water. ALWAYS WORK WITH ACIDS IN FUME HOODS. Use teflon tongs to push down any beakers that float to the surface. Be sure to rinse the tongs thoroughly in ultrapure water after use (to remove the acid). BE SURE TO LABEL THE BEAKER AS CONTAINING ACID UNLIKE MANY LAB VISITORS/INTERNS. IF YOU DON’T LABEL YOUR ACID BEAKERS I WILL LEAVE THREATENING NOTES AROUND LAB AND ON YOUR DESK.
6. Put beaker on hotplate and let sit overnight at a temperature of ~100 deg C. Boiling the hydrochloric acid for 1 hour is also recommended.
7. Pour the hydrochloric acid into another 2L glass beaker. You can use this acid for the next batch of beakers to be cleaned- I generally reuse my acids 8 times.
8. Rinse the beakers 3x in ultrapure water. Be sure to dispose of this water (which has trace acid in it from the rinsing) in a waster beaker or properly set-up sink.
9. Add Aqua Regia “Royal Water”, a mixture of  pure nitric acid and pure hydrochloric acid in a 1:3 ratio. Be careful! Aqua Regia is called royal water because it can dissolve noble metals such as gold. This is strong stuff… which is good because we want superclean beakers. When you first form aqua regia it will bubble like crazy, so be extra careful when working with freshly-made aqua regia. DO NOT PUT AQUA REGIA ON THE HOTPLATE. DO NOT BOIL AQUA REGIA. DO YOU HEAR ME, INTERN?
10. Let beakers sit in aqua regia (cold) overnight. 
11. Pour out the aqua regia into another glass beaker. Again, the aqua regia can be used up to 8 times.
12. Rinse the beakers 3x in ultrapure water. Be sure to dispose of this water (which has trace acid in it from the rinsing) in a waster beaker or properly set-up sink.
13. Add 50% nitric acid. Make this by adding concentrated pure nitric acid to ultrapure water.
14. Put beaker on hotplate and let sit overnight at a temperature of ~100 deg C. Boiling the hydochloric acid for 1 hour is also recommended.
15. Pour out the 50% nitric acid into another glass beaker. Again, the nitric acid can be used up to 8 times.
16. Rinse 3x in ultrapure water. Be sure to dispose of this water (which has trace acid in it from the rinsing) in a waster beaker or properly set-up sink.
17. Fill beaker up with ultrapure water and add ~1mL of ultrapure nitric. Let boil for 1 hour.
18. Cool, then rinse 1 more time in ultrapure water.
19. Check every beaker for sticky spots using a drop of ultrapure water. If the drop sticks/hesitates anywhere on the beaker, wash the beaker again. If the drop moves smoothly around the beaker, put the beaker in a clean place (I use a flowbox) to dry. You don’t want it to accumulate dust while it dries!

Below is a link to a fun video of gold dissolving in aqua regia, but note the (oh the horror!) ungloved hand moving the beaker around. ALWAYS WEAR GLOVES WHEN WORKING WITH AQUA REGIA.
Aqua Regia Video